
An image gallery is a collection of photos displayed together in one place on a web page or blog post. It helps you organize visuals neatly and present them in an engaging, professional-looking layout. WordPress includes a built-in Gallery block that allows you to create simple galleries without installing any plugin.
Whether you run a blog, portfolio, travel site, photography page, or online store, galleries make it easier for visitors to browse multiple images at once. This improves user experience and enhances the overall look of your content.
In this post, we’ll show you two easy methods to create image galleries in WordPress. First, we’ll walk you through creating a gallery using the default Gallery block. Then, we’ll show you how to build more advanced and highly customizable galleries using the Galleryberg plugin. Read till the end to choose the option that best fits your needs.
Method 1: Using the Default Gallery Block
Now, in this section, we’ll explain the process of how to create an image gallery in WordPress, without using a plugin. Let’s begin!
Step 1: Open Your Page or Post
Log into your WordPress dashboard. Open the post or page where you want to create the gallery.
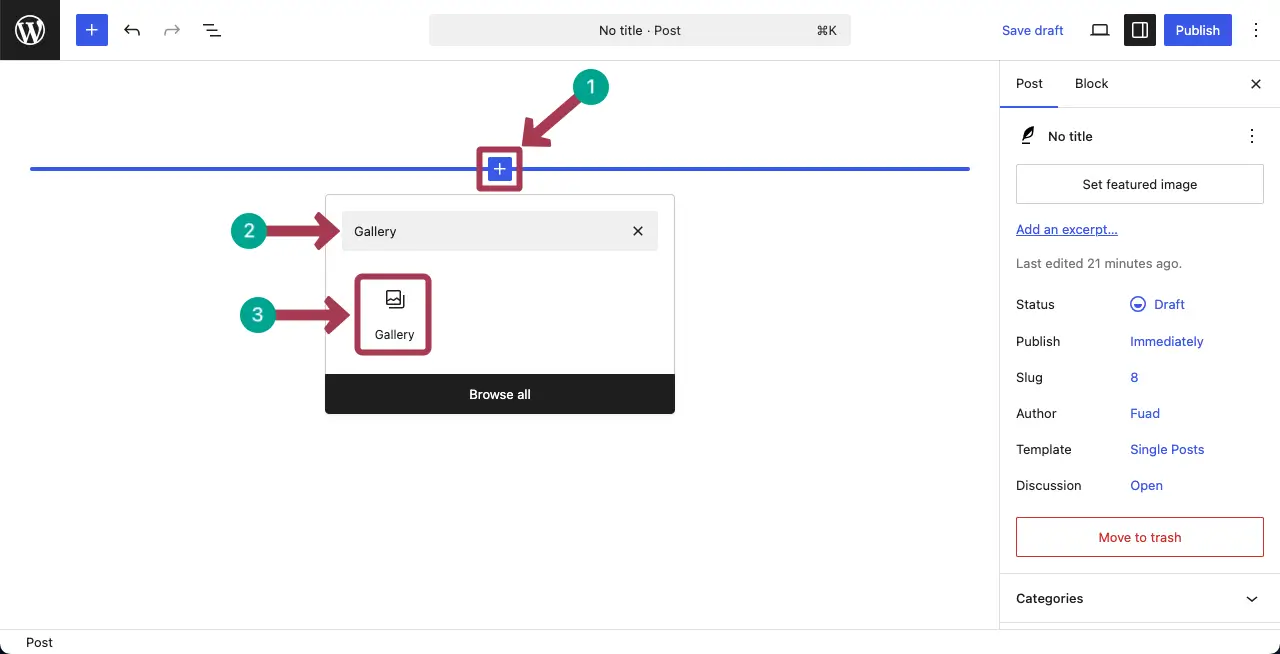
Step 2: Add a Gallery Block
In the editor area, click on the plus (+) icon to add a new block. In the block search bar, type ‘Gallery‘ and select the Gallery Block.
Step 3: Upload or Select Images
Once the Gallery block is selected, you’ll get two options to add images. They are:
- Upload (add images from local drives)
- Media Library (already saved in your site’s media library)
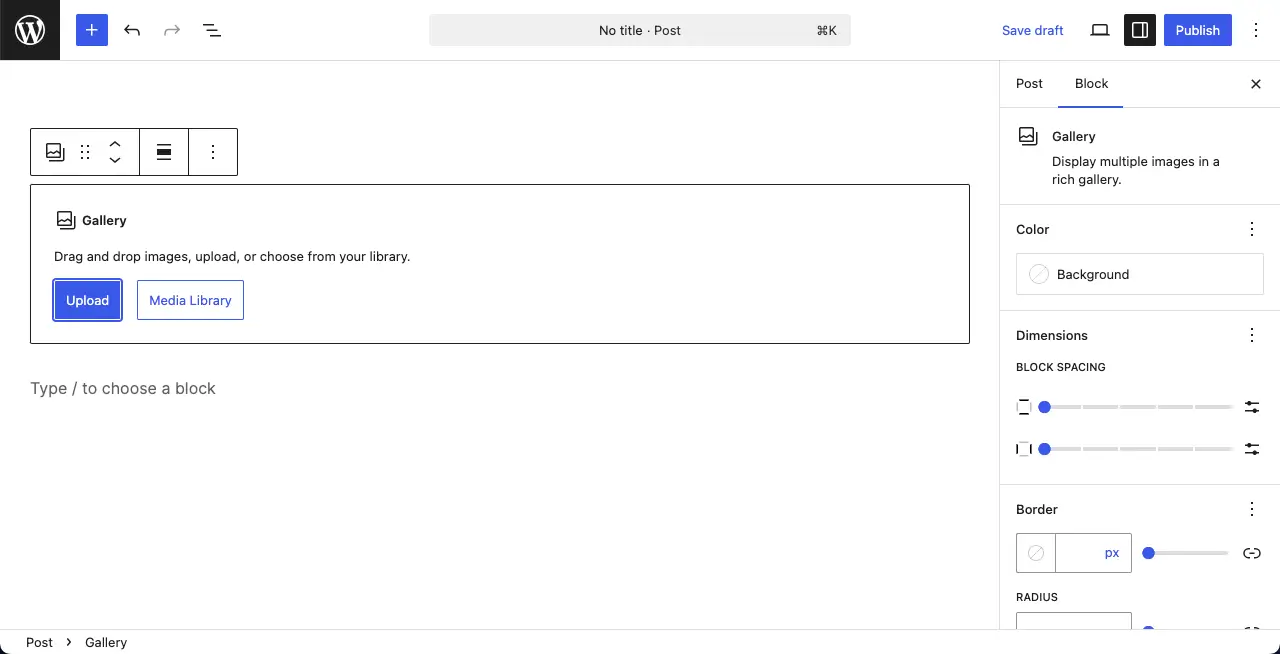
Now, choose the option by which you want to add images to the gallery. For this tutorial, we’ll choose the Upload option.
You can see that we have already added images to the gallery using the Upload option.
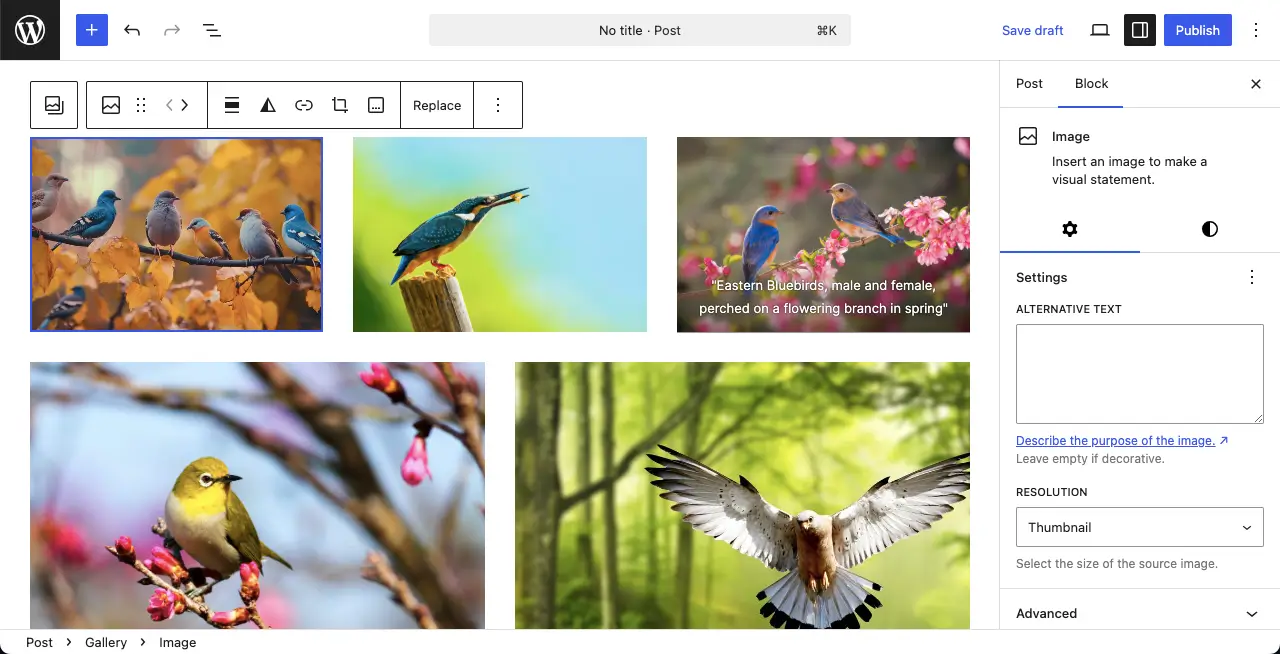
Step 4: Arrange Your Images
After images are added to the gallery, if you want to change the position of the images, you can do this by dragging. See the process in the video attached below.
Step 05: Add Alt-Text to the Gallery Images
Hope you already know that alt-texts help Google understand the type and meaning of your images. Google uses these alt-texts to preset these images to users based on their search queries.
Select each one by one and add the necessary alt-texts.
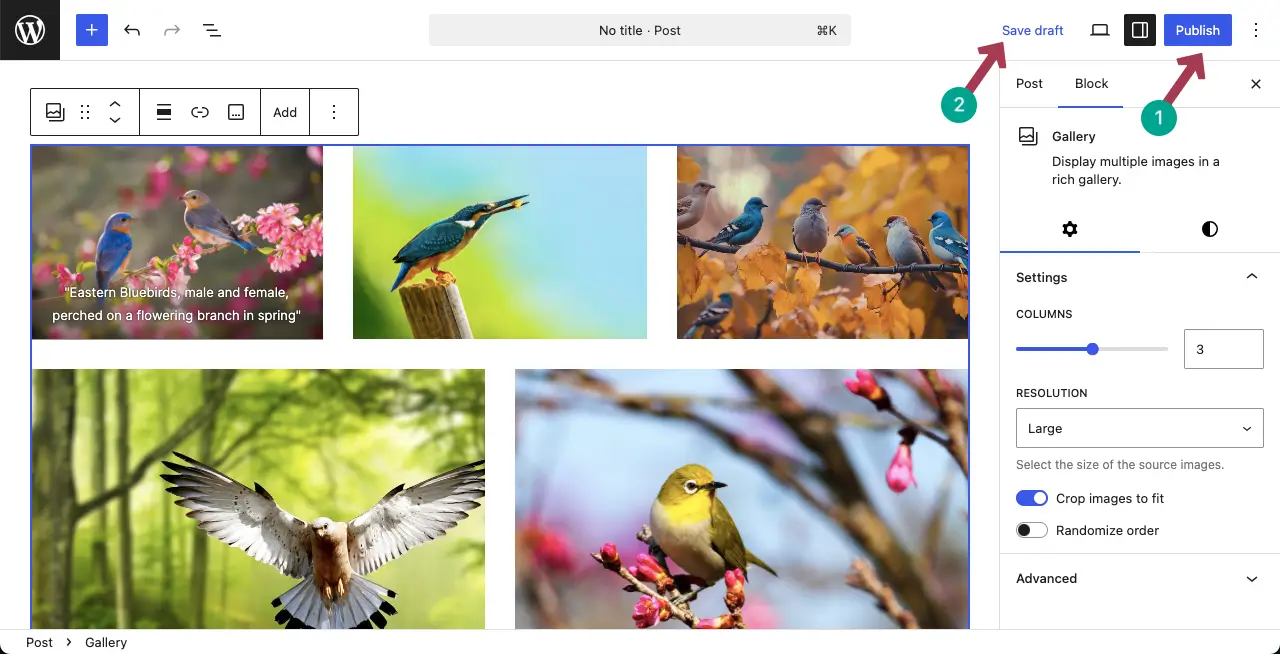
Step 6: Configure Gallery Settings
On the right sidebar, you will see gallery settings. You can choose: the number of columns and image resolution (thumbnail, medium, large, full size). Do the necessary configuration as needed.
To get these options, select the entire gallery by clicking the gallery block.

Step 7: Publish or Save
When everything is done, publish or save the gallery by clicking the respective button.
Thus, you can simply create a gallery on WordPress without using any button.
Method 2: Using the Galleryberg Plugin
If you want more flexibility than the default Gallery block offers, consider using the Galleryberg plugin.
Galleryberg is a free Gutenberg‑ready gallery block that adds extra layouts (tiles, square, masonry, justified, and mosaic) along with a responsive lightbox and detailed styling controls.
Now let’s see how to create an image gallery using the Galleryberg plugin.
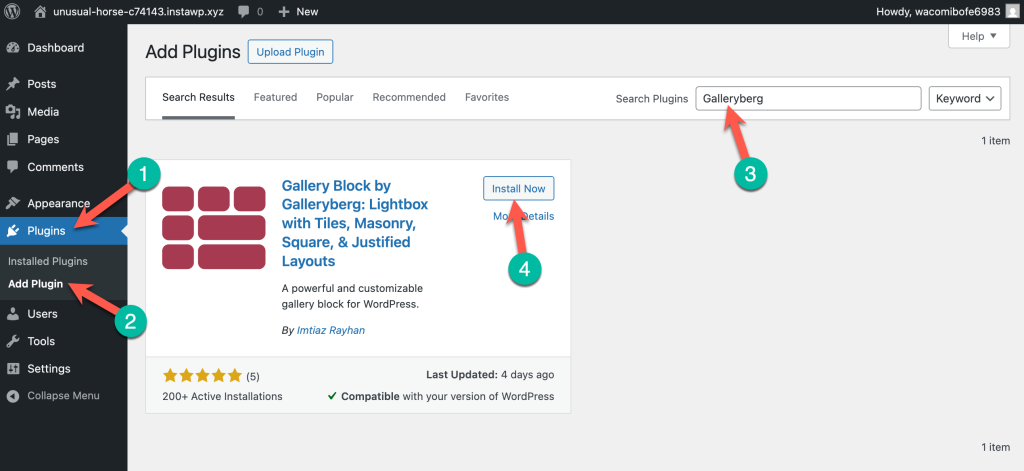
Step 1: Install and Activate the Plugin
First you need to install the plugin. From your WordPress dashboard go to Plugins > Add New and search for “Galleryberg”. Click Install Now on the Galleryberg card and then click Activate to turn it on.
Alternatively, you can download the ZIP file from WordPress.org and upload it manually. Once activated, Galleryberg will be available in the block editor.
Step 2: Transform the Default Gallery Block to Galleryberg (Optional)
If you’ve already created a Gallery with the core Gallery block, you can transform it to the Galleryberg block.
Simply click on the Gallery icon from the toolbar and click on ‘Galleryberg Gallery’ under the ‘TRANSFORM TO’ option.
The Gallery block will be converted to Galleryberg block
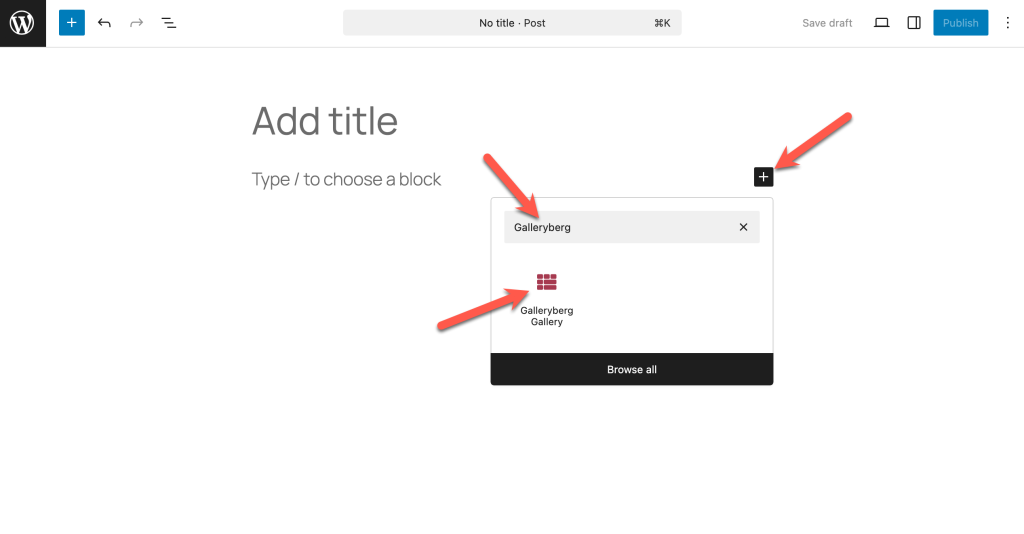
Step 3: Insert the Galleryberg block
To create a new Gallery, cllick the + button to add a new block and type “Galleryberg” in the search bar. Select the Galleryberg block.
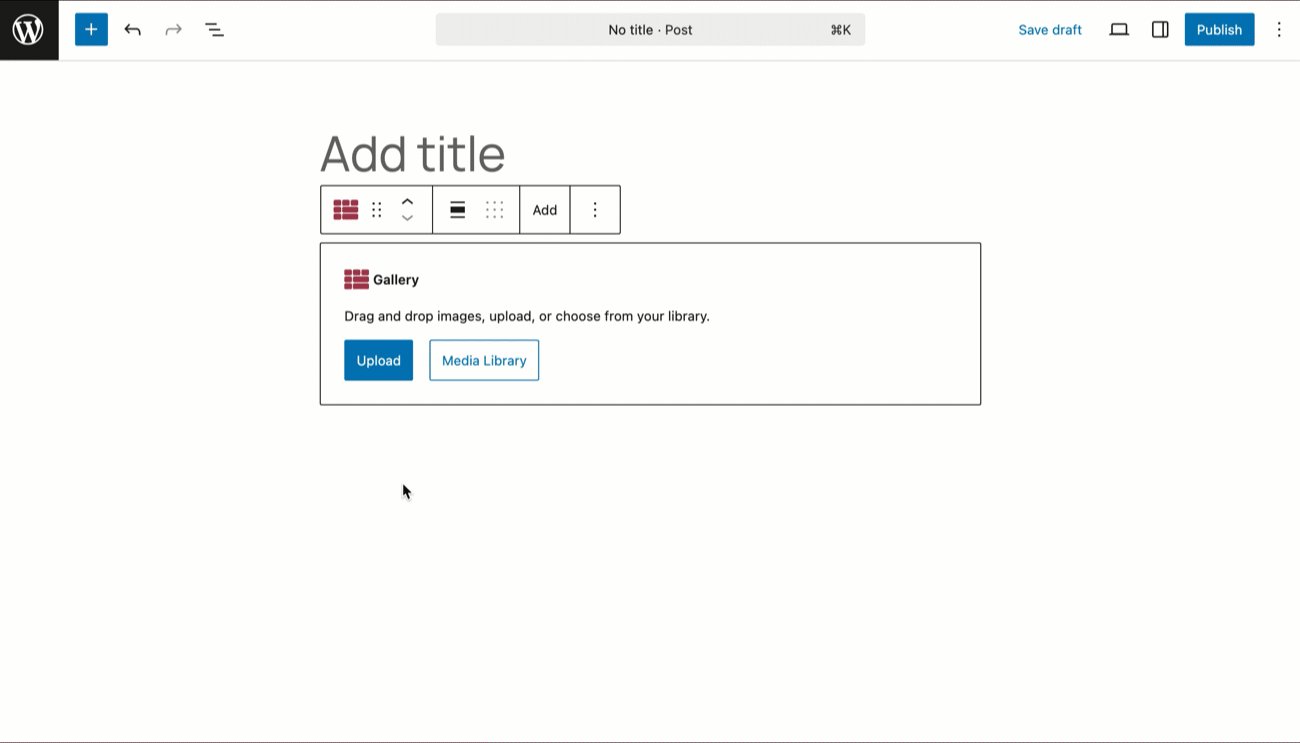
The block will appear in your editor ready to accept images.
Step 4: Add images to Your Gallery
Click the Upload button to add new images or choose Media Library to pick from existing images. Select the photos you want to include.
The images will immediately appear inside the Galleryberg block, and you can rearrange them by dragging.
Step 5: Choose a Layout
Galleryberg offers several layouts that aren’t available in the default Gallery block. You can choose from tiles, square, masonry, justified, or mosaic (pro) styles. Tiles and square layouts create a classic grid, while masonry and justified layouts arrange images dynamically to make the best use of space.
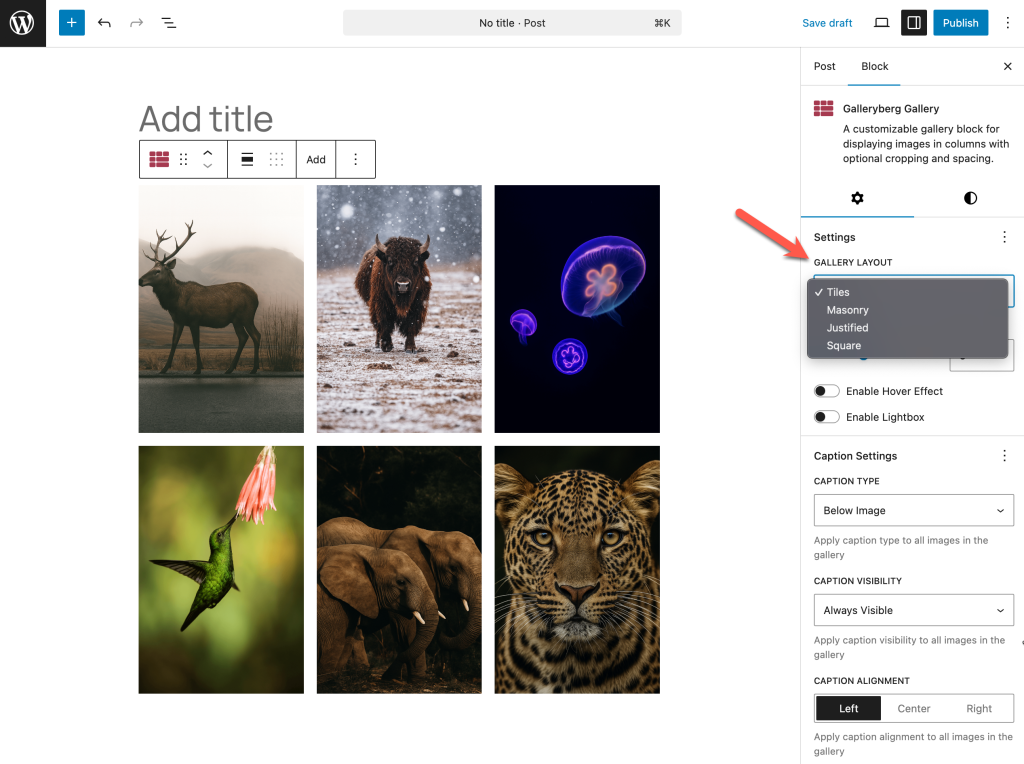
To pick a layout, select the gallery block and use the Layout dropdown in the right‑hand sidebar.
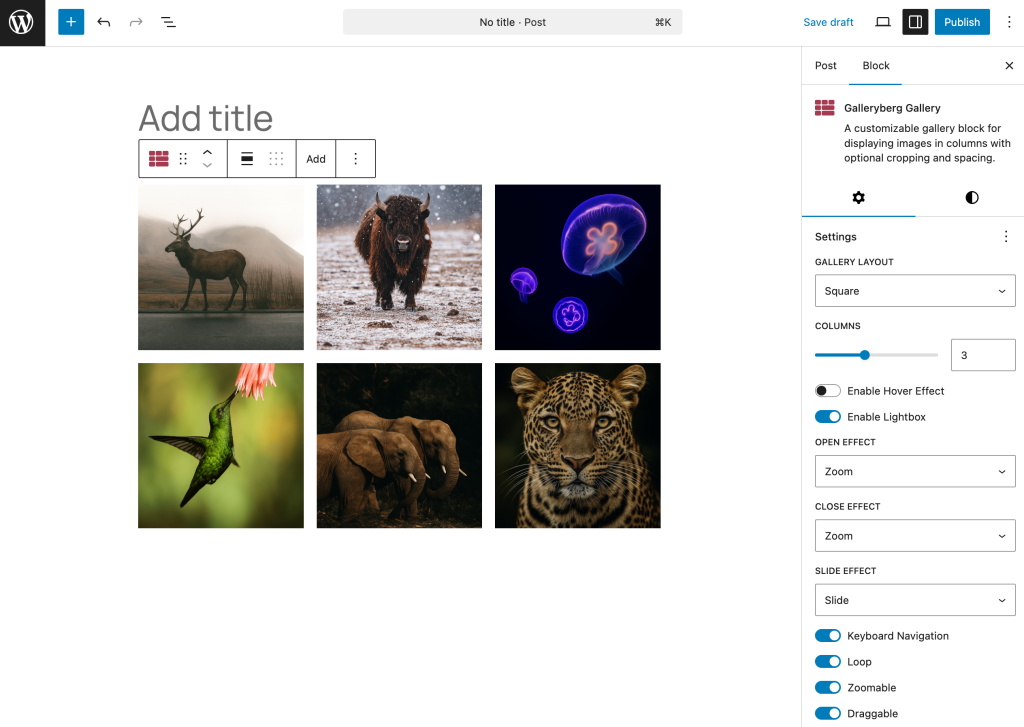
Step 6: Customize Your Gallery Settings
One of the biggest benefits of Galleryberg is its detailed customization options. In the block settings you can:
- Set the number of columns from 1 to 6 and adjust spacing between images.
- Decide where captions should appear (Below Image, Full Overlay, and Bar Overlay)
- Add borders or rounded corners using the Border and Border Radius controls.
These settings allow you to match the gallery style to your theme and create a consistent look.
Step 7: Enable the lightbox (optional)
If you want visitors to click on images and see them in a larger popup, enable the Lightbox feature in the sidebar. Galleryberg’s built‑in lightbox offers smooth zoom animations, keyboard and touch navigation, looping and zoom controls. Visitors can move between photos using arrow keys or swipe gestures on mobile devices, and the lightbox is fully responsive.
Step 7: Publish or Update Your Page
Once you’re happy with the layout and settings, click Preview to see how the gallery looks, and then hit Publish (or Update if you’re editing an existing post).
Your gallery will be visible on the front‑end with the chosen layout and customizations.
Using Galleryberg is an excellent way to go beyond WordPress’s basic gallery functionality. With advanced layouts, lightbox effects and precise controls over columns, spacing and image appearance, you can create a professional‑looking gallery that matches your brand and improves user engagement.
Quick Comparison
FAQs
What’s the easiest way to create an image gallery in WordPress?
The simplest way is to use the built-in Gallery block inside the Gutenberg editor. You can upload images, arrange them, and configure basic settings without installing any plugin.
Do I need a plugin to create image galleries?
No. WordPress already includes a Gallery block that lets you create basic galleries.
However, if you want advanced layouts, lightbox effects, captions, borders, or more control, using a plugin like Galleryberg is recommended.
What is the difference between the default Gallery block and the Galleryberg plugin?
Default Gallery Block: Basic grid layout, simple settings, no advanced design options.
Galleryberg Plugin: Offers tiles, square, masonry, justified, and mosaic (pro) layouts, a built-in lightbox, caption styles, spacing controls, border options, and deeper customization.
Can I change the order of images in a WordPress gallery?
Yes. Both in the default Gallery block and the Galleryberg block, you can rearrange images simply by dragging and dropping them.
How do I add alt-text to images in a gallery?
Select each image inside the gallery and enter the alt-text from the sidebar.
Alt-text helps with SEO and makes your site accessible for screen readers.
How do I enable a lightbox for my image gallery?
The default Gallery block in WordPress does not include a lightbox feature.
But Galleryberg comes with a fully responsive lightbox that you can enable from the sidebar settings with a simple toggle.
What gallery layouts does Galleryberg offer?
Galleryberg includes multiple layouts such as:
- Tiles
- Square
- Masonry
- Justified
- Mosaic (Pro)
These layouts give you more creative control compared to the default WordPress gallery.
Can I adjust the number of columns in my gallery?
Yes. Both the default Gallery block and Galleryberg allow you to set the number of columns.
Does the Galleryberg plugin work with all WordPress themes?
Yes. Galleryberg is built for the Gutenberg editor and works with all modern WordPress themes, especially block-based themes built for WordPress 6+.
Can I create multiple galleries on the same page?
Absolutely. You can add multiple Gallery or Galleryberg blocks on a single page and customize each gallery separately.
Conclusion
Creating an image gallery in WordPress is easier than ever—whether you use the built-in Gallery block or the more advanced Galleryberg plugin. The default Gallery block is perfect for beginners or anyone who needs a quick, simple gallery without extra features. But if you want modern layouts, lightbox effects, and deeper customization, Galleryberg gives you the creative flexibility the core block can’t provide.
Whichever method you choose, always use high-quality and optimized images to keep your pages fast and visually appealing. Maintaining consistent image sizes and clean spacing will also help your galleries look more professional.
If you have any questions or need help choosing the right method, feel free to ask in the comments below!
Leave a Reply