


Do you want to show off your photos one at a time, with smooth sliding and arrows your visitors can click? A slideshow is a great way to share wedding photos, event highlights, product shots, or a portfolio without filling the whole page with a big grid.
WordPress does not come with a slideshow block out of the box. In this guide, we will show you two easy ways to create a slideshow in WordPress with Galleryberg: a click-through lightbox slideshow and an autoplay slideshow that sits right on the page. No code needed.
Why Use a Slideshow in WordPress?
A slideshow shows one image at a time, so each photo gets the full attention of your visitor. Here are a few good reasons to use one:
- It saves space. Ten photos take up the room of one, which keeps long pages short and tidy.
- It tells a story. Photos appear in order, which is perfect for weddings, trips, events, and before and after projects.
- It looks great on phones. Visitors can swipe through slides with one finger.
- It grabs attention. Moving slides near the top of a page invite people to stop and look.
Does WordPress Have a Built-in Slideshow?
Not really. The default Gallery block shows your images in a grid of columns and rows. You can turn on “Expand on click” so an image opens larger, but there is no option to make the images slide one after another or play on their own.
That is why most site owners add a gallery plugin. Galleryberg is a block-based gallery plugin that works inside the normal block editor, so you build your slideshow the same way you build any other part of your page. If you are new to galleries, start with our guide on how to create an image gallery in WordPress.
Method 1: Create a Lightbox Slideshow with the Core Galleryberg Plugin
With this method, your images appear as a neat gallery on the page. When a visitor clicks any photo, it opens full screen, and they can move through the rest of the gallery like a slideshow using arrows, the keyboard, or a swipe. Everything here is included in the core Galleryberg plugin.
Step 1: Install and Activate Galleryberg
In your WordPress dashboard, go to Plugins → Add New, search for “Galleryberg”, then click Install Now and Activate.
Step 2: Add the Galleryberg Block and Your Images
Open the post or page where you want the slideshow. Click the + button, search for “Galleryberg”, and add the block. Then upload new photos or choose them from your Media Library.
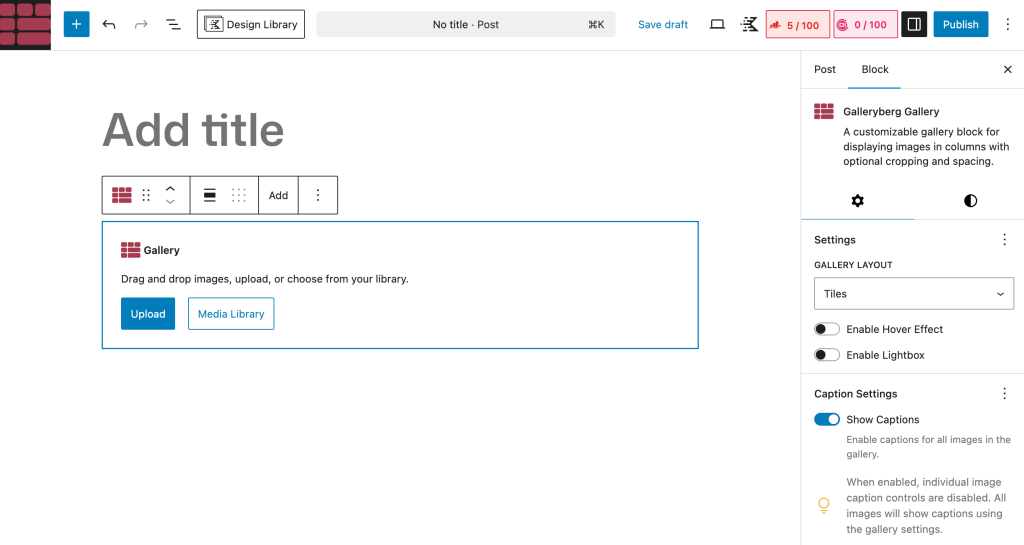
Drag the images into the order you want them to appear in the slideshow. The first image in the gallery is the first slide.
Step 3: Turn On the Lightbox
Select the gallery block and open the Lightbox panel in the settings sidebar. Switch on Enable Lightbox. Now you can fine-tune how the slideshow behaves:
- Open and close effects: choose how the lightbox appears and disappears, such as zoom or fade.
- Slide effect: choose how one image changes to the next, such as slide or fade.
- Keyboard navigation: lets visitors use the arrow keys to move between images.
- Loop: jumps back to the first image after the last one, so the slideshow never hits a dead end.
- Draggable and zoomable: let visitors swipe between images and zoom in on details.
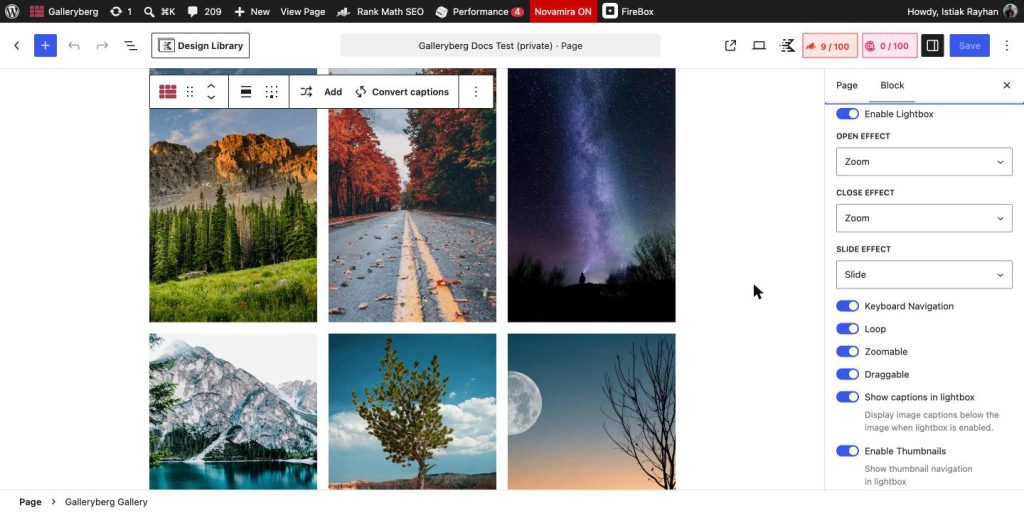
If your images have captions, turn on the option to show captions in the lightbox, so each slide comes with its description. Want to learn more about lightbox options? Read our guide on how to add lightbox effects to WordPress galleries.
Step 4: Publish and Test
Click Publish or Update, then open the page. Click any image and use the arrows to move through your slideshow. Try it on your phone too, and swipe left and right.
Method 2: Create an Autoplay Slideshow with Galleryberg Pro
If you want the slides to play on the page by themselves, use the Carousel layout in Galleryberg Pro. Set it to show one slide at a time, turn on autoplay, and you have a classic slideshow with arrows and dots.
Step 1: Switch the Gallery Layout to Carousel
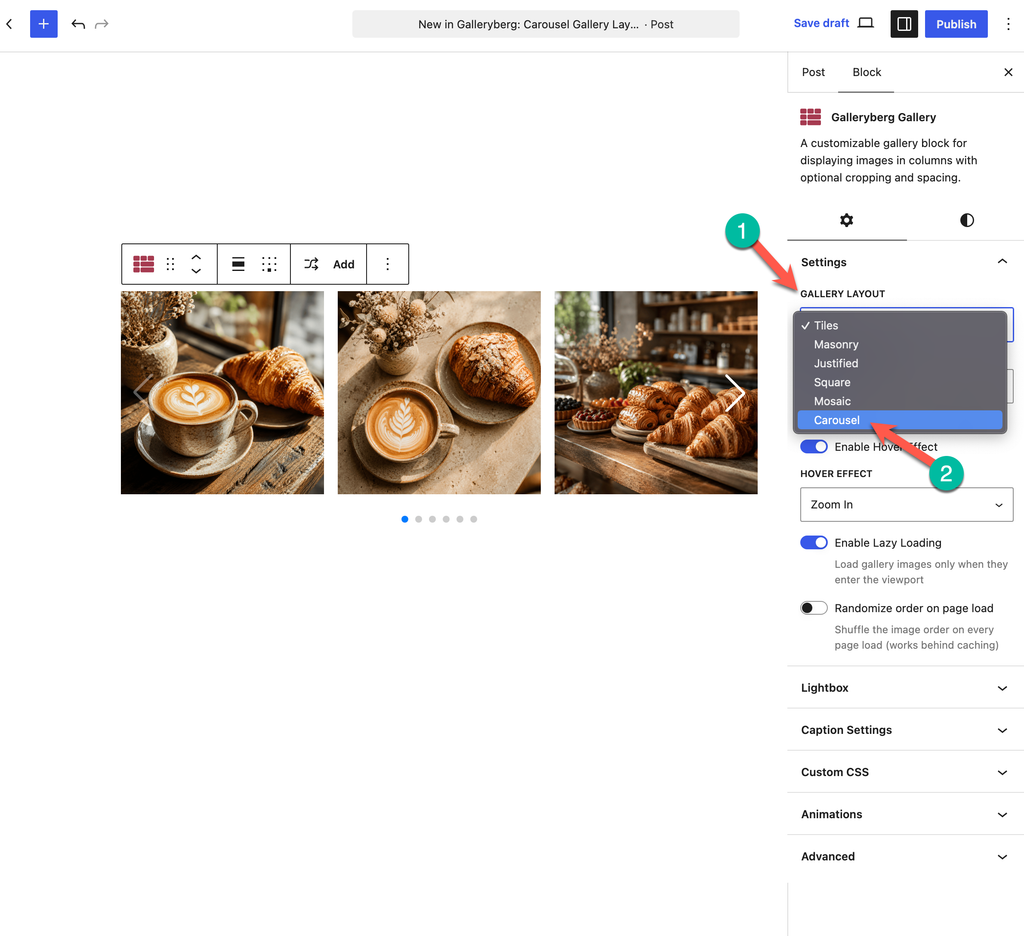
Add a Galleryberg block with your images, as shown in Method 1. Then select the block and, in the settings sidebar, open the Layout dropdown and choose Carousel.
Step 2: Show One Slide at a Time
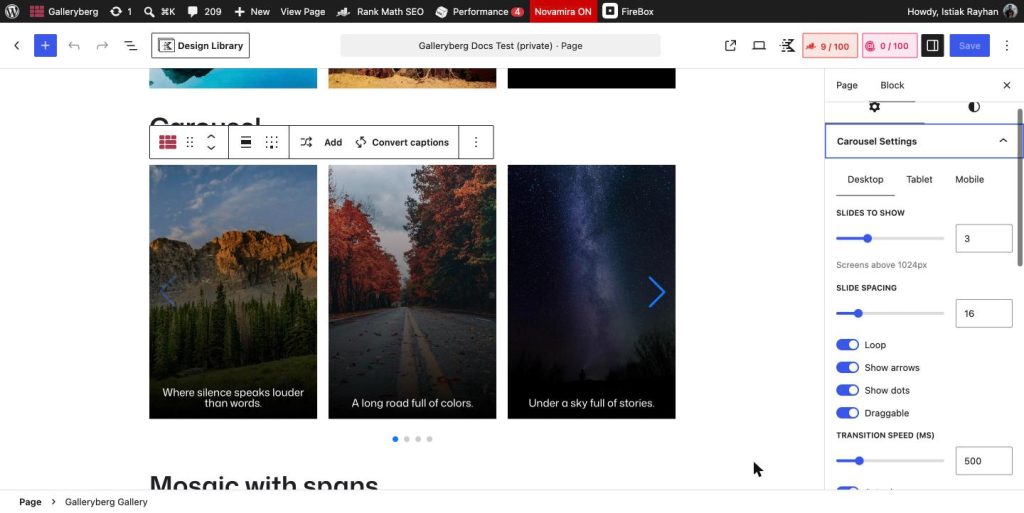
Open the Carousel Settings panel. Under Slides to Show, set the number to 1 for desktop, tablet, and mobile. By default, the carousel shows several images side by side, so this is the setting that turns it into a slideshow.
Step 3: Turn On Autoplay
Switch on Autoplay, then set the Autoplay delay (ms). This is how long each slide stays on screen, in milliseconds. For example, 4000 means four seconds per slide. Three to five seconds is a comfortable pace for most photos.
Step 4: Adjust Navigation and Motion
The same panel has a few more options to make the slideshow your own:
- Loop: starts again from the first slide after the last one.
- Show arrows and Show dots: add previous and next buttons and clickable dots below the slides.
- Draggable: lets visitors swipe or drag to change slides.
- Transition speed (ms): how fast one slide moves to the next. Around 500 feels smooth.
- Slide Spacing: the gap between slides as they move.
- Arrow and dot colors: match the controls to your brand colors.
You can keep the lightbox on as well. Then visitors can watch the slideshow on the page and click any slide to see it full screen. For a closer look at this layout, see our post on the Galleryberg carousel gallery layout.
Step 5: Publish Your Slideshow
Publish or update the page and check it on the front end. Here is a live slideshow built with these exact steps: one slide at a time, autoplay every four seconds, loop, arrows, dots, and the lightbox turned on.






Tips for a Better WordPress Slideshow
- Use images of the same shape. Landscape photos with the same aspect ratio keep the slideshow from jumping in height.
- Keep it short. Five to ten slides is usually enough. Put your best photo first.
- Do not rush. A delay that is too short makes it hard to enjoy each photo. Leave arrows on so people can move at their own pace.
- Write alt text and captions. Alt text helps screen reader users and search engines, and captions add context to each slide.
- Optimize your images. Compress large photos and turn on lazy loading in Galleryberg Pro so the page stays fast. Our guide on making galleries load faster has more tips.
Planning to share photos from a party, conference, or wedding? Our guide on how to create an event gallery in WordPress pairs nicely with a slideshow.
Frequently Asked Questions
Can I create a slideshow in WordPress without a plugin?
WordPress does not include a slideshow block. The default Gallery block only shows images in a grid, and “Expand on click” opens one image at a time. For a real slideshow with arrows, swiping, or autoplay, you need a gallery plugin like Galleryberg.
Do I need Galleryberg Pro to make a slideshow?
Not for a click-through slideshow. The lightbox in the core Galleryberg plugin lets visitors open any image full screen and move through the gallery with arrows, the keyboard, or a swipe. For a slideshow that plays on the page by itself, you need the Carousel layout in Galleryberg Pro.
How do I make my slideshow play automatically?
Switch the gallery layout to Carousel, set Slides to Show to 1 for every device, then turn on Autoplay in the Carousel Settings panel. Use Autoplay delay (ms) to choose how long each slide stays on screen.
Will my slideshow work on phones and tablets?
Yes. Visitors can swipe between slides on touch screens. You can set the number of slides to show separately for desktop, tablet, and mobile, so the slideshow fits every screen.
Conclusion
A slideshow is one of the simplest ways to make your photos stand out without taking over the page. With the core Galleryberg plugin, you can turn any gallery into a full screen, click-through slideshow in a few clicks. With Galleryberg Pro, the Carousel layout gives you a true autoplay slideshow with arrows, dots, and swipe support.
Want your slideshow to look great on every screen? Check out our guide on how to create responsive galleries in WordPress next.